
Contact Form 7の初期状態
Contact Form 7 は、問合せとか申込みのフォームを簡単に作成できて良いのですが、見た目が非常にシンプルです。
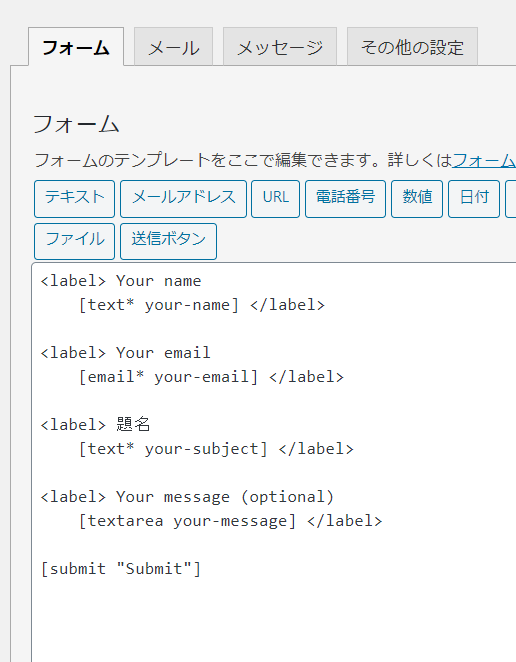
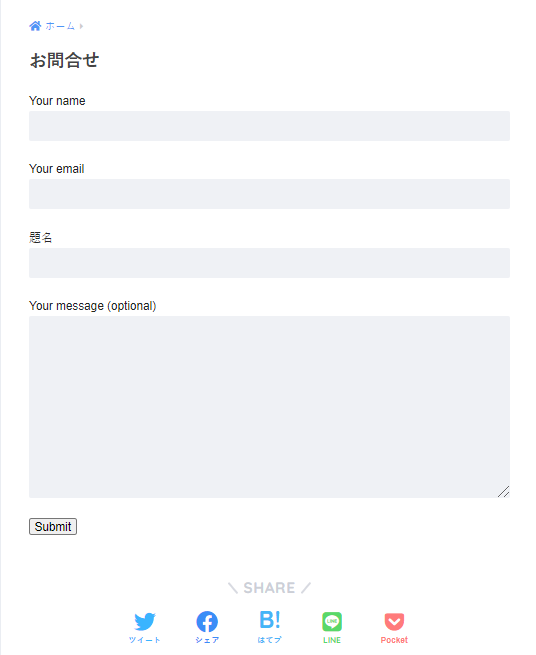
Defaultの状態のフォームのコードと実際の表示は下記のようになります。
表形式に変更
まずは表形式に変更します。
お問合せのフォームのコードを下記に変更します。
<table class="inquiry">
<tr>
<th>
<span class="haveto">必須</span><span>お名前</span>
</th>
<td>
[text* your-name class:textsp placeholder"名字 名前"]
</td>
</tr>
<tr>
<th>
<span class="haveto">必須</span><span>メールアドレス</span>
</th>
<td>[email* your-email class:mailsp placeholder"kagekage@gmail.com"]</td>
</tr>
<tr>
<th>
<span class="any">任意</span><span>電話番号</span>
</th>
<td>
[tel your-tel class:tel placeholder"090-1111-2222"]
</td>
</tr>
<tr>
<th>
<span class="haveto">必須</span><span>ドロップダウンメニュー</span>
</th>
<td>
[select* dpmenu include_blank class:drop "サンプル1" "サンプル2" "サンプル3"]
</td>
</tr>
<tr>
<th>
<span class="any">任意</span><span>チェックボックス横並び【1つを選択】</span>
</th>
<td>
[checkbox checkbox-1 exclusive use_label_element default:1 class:check1 "サンプル4" "サンプル5" "サンプル6"]
</td>
</tr>
<tr>
<th>
<span class="haveto">必須</span><span>チェックボックス横並び【複数を選択】</span>
</th>
<td>
[checkbox* checkbox-2 use_label_element default:1 class:check2 "サンプル7" "サンプル8" "サンプル9"]</td>
</tr>
<tr>
<th>
<span class="any">任意</span><span>チェックボックス縦並び【1つを選択】</span>
</th>
<td>
[checkbox checkbox-3 exclusive use_label_element default:1 class:verticallist class:check3 "サンプル10" "サンプル11" "サンプル12"]
</td>
</tr>
<tr>
<th>
<span class="haveto">必須</span><span>チェックボックス縦並び【複数を選択】</span>
</th>
<td>
[checkbox* checkbox-4 use_label_element default:1 class:verticallist class:check4 "サンプル13" "サンプル14" "サンプル15"]
</td>
</tr>
<tr>
<th>
<span class="any">任意</span><span>ラジオボタン横並び</span>
</th>
<td>
[radio radio-1 use_label_element default:1 class:radio1 "サンプル16""サンプル17""サンプル18"]
</td>
</tr>
<tr>
<th>
<span class="haveto">必須</span><span>ラジオボタン縦並び</span>
</th>
<td>
[radio radio-2 use_label_element default:1 class:verticallist class:radio2 "サンプル19""サンプル20""サンプル21"]
</td>
</tr>
<tr>
<th>
<span class="any">任意</span><span>数値のスピン形式</span>
</th>
<td>
[number number-1 min:10 max:100 placeholder class:number1 "数値の値は指定できる"]
</td>
</tr>
<tr>
<th>
<span class="haveto">必須</span><span>日付</span>
</th>
<td>
[date* date-960 placeholder class:datesp ]
</td>
</tr>
<tr>
<th>
<span class="any">任意</span><span>中級者向け回答形式のタグ</span>
</th>
<td>
[quiz quiz-1 class:qyizsp "質問:2019年に発表された新元号は?|令和"]
</td>
</tr>
<tr>
<th>
<span class="haveto">必須</span><span>郵便番号</span>
</th>
<td>
[text* your-postalcode class:p-postal-code placeholder"123-4567"]
</td>
</tr>
<tr>
<th>
<span class="haveto">必須</span><span>都道府県</span>
</th>
<td>
[text* your-prefectures class:p-region placeholder"◯◯県"]
</td>
</tr>
<tr>
<th>
<span class="haveto">必須</span><span>ご住所</span>
</th>
<td>
[text* your-address class:p-locality placeholder"○○市○○1-2-3 ○○マンション 101号室"]
</td>
</tr>
<tr>
<th>
<span class="haveto">必須</span><span>お問い合わせ内容</span>
</th>
<td>
[textarea* your-message class:content placeholder "1行以上のテキスト入力欄"]
</td>
</tr>
</table>
[acceptance acceptance-442 class:spam1]スパムメール防止のため、こちらのボックスにチェックを入れてから送信してください。
[submit id:formbtn "上記の内容で送信する"]
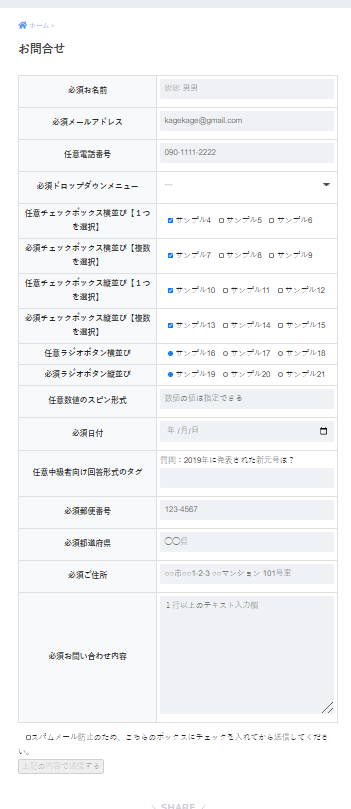
実際の見た目が下記の様に変わりました。
style.cssで体裁を整えます
表形式となって、Defaultよりは随分と申込みフォームらしくなりましたが、まだ体裁が整っていないので、テーマのstyle.cssに下記コードを追加して体裁を整えます。
/*Contact Form 7カスタマイズ*/
/*スマホContact Form 7カスタマイズ*/
@media(max-width:500px){
.inquiry th,.inquiry td {
 display:block!important;
 width:100%!important;
 border-top:none!important;
 -webkit-box-sizing:border-box!important;
 -moz-box-sizing:border-box!important;
 box-sizing:border-box!important;
}
.inquiry tr:first-child th{
 border-top:1px solid #d7d7d7!important;
}
/* 必須・任意のサイズ調整 */
.inquiry .haveto,.inquiry .any {
font-size:10px;
}}
/*見出し欄*/
.inquiry th{
 text-align:left;
 font-size:14px;
 color:#444;
 padding-right:5px;
 width:30%;
 background:#f7f7f7;
 border:solid 1px #d7d7d7;
}
/*通常欄*/
.inquiry td{
 font-size:13px;
 border:solid 1px #d7d7d7;
}
/*横の行とテーブル全体*/
.entry-content .inquiry tr,.entry-content table{
 border:solid 1px #d7d7d7;
}
/*必須の調整*/
.haveto{
 font-size:7px;
 padding:5px;
 background:#ff9393;
 color:#fff;
 border-radius:2px;
 margin-right:5px;
 position:relative;
 bottom:1px;
}
/*任意の調整*/
.any{
 font-size:7px;
 padding:5px;
 background:#93c9ff;
 color:#fff;
 border-radius:2px;
 margin-right:5px;
 position:relative;
 bottom:1px;
}
/*ラジオボタンを縦並び指定*/
.verticallist .wpcf7-list-item{
 display:block;
}
/*送信ボタンのデザイン変更*/
#formbtn{
 display: block;
 padding:1em 0;
 margin-top:30px;
 width:100%;
 background:#ffaa56;
 color:#fff;
 font-size:18px;
 font-weight:bold;
 border-radius:2px;
 border: none;
}
/*送信ボタンマウスホバー時*/
#formbtn:hover{
 background:#fff;
 color:#ffaa56;
}

体裁を整えた後の後の見え方は、下記のように7なります。
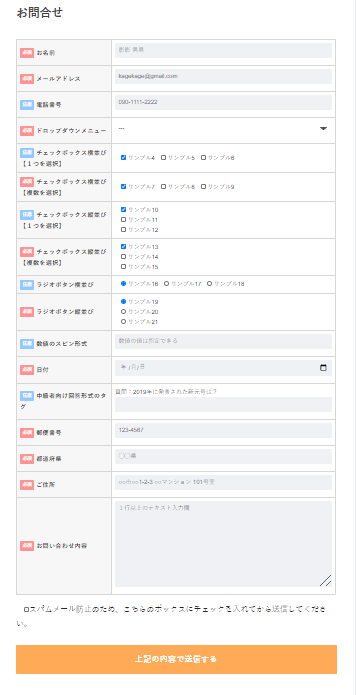
これで、随分と入力フォームらしい体裁になりました。
後は各項目を必要な内容に修正すれば完成です。
修正方法は <tr> ~</tr>がそれぞれ一つの項目になりますので、この間を修正します。
ショートコードの最初の文字列の最後に「*」が付いていると、必須入力項目になりますので、ラベル表示と合わせて修正します。
メールアドレスの確認用入力と一致チェック機能をつける
問い合わせフォームで最も大事な入力項目はメールアドレスですね。
このメールアドレスの誤入力を未然に防ぐために、フォームにメールアドレス入力欄を2つ設けて、一致した場合にOKとするやり方があります。
これをContact Form 7でやってみるとこうなります。
テーマのfunctions.phpに以下を記述。 add_filter( ‘wpcf7_validate_email’, ‘wpcf7_validate_email_filter_confrim’, 11, 2 ); add_filter( ‘wpcf7_validate_email*’, ‘wpcf7_validate_email_filter_confrim’, 11, 2 ); function wpcf7_validate_email_filter_confrim( $result, $tag ) { $type = $tag[‘type’]; $name = $tag[‘name’]; if ( ‘email’ == $type || ‘email*’ == $type ) { if (preg_match(‘/(.*)_confirm$/’, $name, $matches)){ //確認用メルアド入力フォーム名を ○○○_confirm としています。 $target_name = $matches[1]; $posted_value = trim( (string) $_POST[$name] ); //前後空白の削除 $posted_target_value = trim( (string) $_POST[$target_name] ); //前後空白の削除 if ($posted_value != $posted_target_value) { $result->invalidate( $tag,”確認用のメールアドレスが一致していません”); } } } return $result; }
そして、管理画面のメニュー「問い合わせ」(Contact Form 7 の登録ページ)で
メールアドレス 必須[email* your-email]メールアドレス確認 必須[email* your-email_confirm placeholder “確認のためもう一度入力してください”]
メールアドレスの部分をこんな感じにして登録します。
「メールアドレス確認」の項目名は「メールアドレス」の項目名のうしろに ‘_confirm’ を付けたした名称にします。
住所の自動入力
住所の入力項目がある場合は、郵便番号を入れると自動的に住所が入力できると便利ですよね。
住所の自動入力の為に、zipaddr-jpというPluginを使います。
zipaddr-jpを有効化して、問合せフォームのコードを下記に修正します。
郵便番号の修正
修正前:
[text* your-postalcode class:p-postal-code placeholder”123-4567″]
修正後:
[text* your-postalcode zip id:zip placeholder”123-4567″]
都道府県の修正
修正前:
[text* your-prefectures class:p-region placeholder”◯◯県”]
修正後:
[text* your-prefectures pref id:pref placeholder”◯◯県”]
ご住所の修正
修正前:
[text* your-address class:p-locality placeholder”○○市○○1-2-3 ○○マンション 101号室”]
修正後:
[text* your-address city id:city addr id:addr placeholder “○○市○○1-2-3 ○○マンション 101号室”]
これだけのカスタマイズを行えば、シンプルで素っ気のなかったContact Form 7 をいろいろなバリエーションで使用できますね。
本記事に記載のコードは、 https://kagesai.net/contactform7perfectguide/ を参考にさせていただきました。


